CSGO - de_valorant
This map was done for the Design Den Valorant level design challenge. It was built using Hammer SDK due to Valorant not having a level editor and CSGO having similar gameplay. One of the challenge requirements prohibited the use of non-dev textures. Ultimately, due to it being designed and playtested in CSGO, it ended up being a fully functional CSGO map designed around competitive play. The map was playtested in a competitive format with 2 full teams of human players, some of whom were top competitive ranks in CSGO.
Theme
de_Valorant is based in Japan 10 years after the economic collapse of a major city. The residents have continued to live their lives as the city turns to ruins. de_Valorant takes place in the market district of one of the many shanty towns around the city.
Playstyle
The map was designed with the idea of 2 Mid lanes (1: Mid and 2: Tunnels) these lanes give the Attacking team extra paths to attack bomb sites, but in doing so, also leaves them vulnerable to flanks from off-site Defenders rotating to help teammates. This makes holding those lanes very important but also making sure you’re not leaving your team a player down. These important lanes have short routes back onto bomb sites so the Defending player can move between the 2 positions, but Defenders need to be careful that there isn’t an Attacker lurking, waiting for them to move away from these important lanes, allowing the Attacker to gain control over Connector.
The Connector area also allows Defenders multiple paths to retake either bomb site after the Attacking team plants. If they are blocked from entering one path, they can fall back and choose a new path but in doing so are potentially allowing the Attackers holding the site to easily predict their movements.
This map gives players the chance to outsmart each other and coordinate interesting strategies with strong communication. Players will need to be aware of their positioning as strong positions have downsides and can lead to you getting easily boxed in, flanked or left with longer rotate times. Situational awareness and thinking before you act plays a big part in this map.
Project Breakdown
CSGO map targeted at high-ranking competitive play
Created using Hammer SDK
Simple and clean layout to minimize overpowered positioning and allow for easier navigation
Meticulously tested site lines to maximize skill-based play and positioning and minimize unfair site lines
4 main choke points
Players will need strong communication to execute plays and defend valuable choke points
Branching routes allow players options to outsmart each other and demonstrate good strategy
Flythrough Video
Overview


Glossary
CT = Counter Terrorist.
T = Terrorist.
Defender (Valorant Terminology) = Counter Terrorist.
Attacker (Valorant Terminology) = Terrorist.
Rotate = Moving from one bomb site to another, usually after attacking a site fails as an Attacker or when the enemy plants the bomb at an unexpected/undefended site as a Defender .
Re-take = When the Defenders have lost a site and are now required to attack the bomb site to take back control or diffuse a planted bomb.
Eco = A round in which players save money for the next round by purchasing cheaper weapons or none at all.
Smoke = Smoke Grenade explodes on impact, filling a small area with thick smoke that blocks player vision and dissipates after a period.
Incendiary/Molotov = A Molotov or Incendiary grenade explodes on impact, filling a small area with damaging fire and dissipates after a period.
Peek = To move out of and back into cover in quick succession.
Peek shoot = To move out of and back into cover in quick succession but firing at the apex of the peek.
Rush = When all or the majority of a team quickly moves as a unit and attacks an area of the map, usually as soon as the round starts to overwhelm the enemy and usually when starting with weaker weapons.
Wall-bang = When bullets penetrate geometry and damage players, usually with a damage penalty based on thickness of an object. Certain objects allow this based on material type and thickness.
Air strafe = A skill-based type of movement that allows players to gain speed while airborne.
Design
Main Routes to Choke Points

Default Positions

Defenders

Attackers
Retake Routes

A - B Retake

B - A Retake
Breakdowns
A Bombsite
One main entrance
Second entrance gained if Attackers get control over Mid
A single Defender can move easily between Mid and A site but can only defend one at a time
Open roof allows for grenades to be thrown into and out of the site from safety
Attackers will require a plan to get the bomb down as the main entrance has too many angles to cover without good usage of utility
Planting the bomb in a safe spot will make it harder for the Attacker to defend against on retakes
Multiple entrance options for retakes but they can be blocked easily, requiring Defenders retaking to play smart or change routes quickly after being blocked


Positioning
Defenders will fall back to default positions as the site gets successfully taken over. Eventually, they will be pushed off the site and have to reroute to attack from a different entrance or try to catch the Attackers off guard by taking a longer path to enter from a flanking entrance. This can pay off but is risky due to the short-timer once the bomb is planted.
Defenders can hold off angles and hide in unexpected places to catch Attackers out but those Defending positions are risky due to either a lack of cover or the position being too boxed in.
Attackers can plant the bomb in a safe spot where they are well covered while planting but this will also help the Defenders when they are diffusing the bomb.
Using Smoke grenades and Molitovs to cut A Site into manageable sections will be paramount in an attack. Defenders will need to be quick to move positions and have good communication to coordinate a defence.
The Defender playing Window Room will need to make sure they aren’t about to get flanked from Mid while also making sure they aren’t leaving their team a player down during an A Site attack
Attacking players that fail to take the site will either need to fall all the way back down A main, or try to use utility to allow them to rotate through Window Room to Mid

Example Plays

Scenario 1
Defenders set up in default positions with one player looking down A Main who has already fallen back
Defenders use utility to hold off attackers as long as they can
Attackers take control of A Main and set up their smoke grenade throws

Scenario 1
The Attackers smokes block line of site on 2 default positions
Along with the smokes an Attacker throws a flash and uses it to kill the Defender in Window Room
The Attackers rush in and take defensive positions while one of them plants the bomb
Choosing where to plant the bomb is crucial. The easier it is to plant in a position, the harder it will be to defend. So it’s incentivized that Attackers co-ordinate to safely get the bomb down in a position that makes it hard for Defenders to diffuse
The Defenders can wait behind the smoke and use sound to gather information or try to find off angles to wait for when the smoke clears to catch Attackers out. Most common situations would have the Defenders fall back to safe positions where they can engage again or wait for reinforcements

Scenario 2
Defenders set up in default positions with one player holding an Off Angle on top of the tall box. This requires a second player to jump on top of to access. This is a trade off as it can waste the time of the second player, not allowing them to get in position in time or it can leave both players open to attack while they do this trick.
Defenders use utility to hold off attackers as long as they can
Attackers take control of A Main and set up their smoke grenade throws

Scenario 2
The Attackers smokes block line of site on 2 default positions
The Attackers try to use a flash but it is anticipated by the Defenders and they avoid getting blinded
2 Attackers rush in and are killed by the off-angle player and the Window Room player
A 3rd Defender who was blocked by the Attacker’s smoke, throws a molotov from behind the smoke to block the A Main entrance. With 2 Attackers down and the site blocked off, the remaining Attackers need to retreat and regroup
Mid


Clear open area with the opposing team as an obvious focal point at either end
Defender side of Mid has easy access to A site and Connector. This makes Mid control extremely important
Taking control of Defender side of Mid is difficult due to all the angles Defenders can hold at their end
Two 50/50 Angle (Player can’t check one angle without being blind to the opposite angle) at Defender side to reduce Attacker power when pushing Mid as it is so valuable. Attackers should be forced to use Utility when trying to gain control
Lesser Split Peak at Attacker side to reduce Defender power when pushing Mid
Attacker side allows players to move between the left and right side of Mid while staying in cover
Attacker side has access to a window that allows players to peak and adds more pressure to the Defenders, this risky though as it requires you to jump onto a box so you can’t get an easy peek shot
This window peak works both ways, and if pushed, Defenders can drop down into Cave and flank Attackers who might be pushing A Main. Your feet are exposed when using this window peak giving it less power
Defenders can move to an opposing piece of cover to the window peak, giving them an off-angle to potentially catch an Attacker by surprise
Players trying to cross from connector to A site or vice versa will need to be careful as an enemy could watch Mid late-game

Example Plays
Scenario 1
Defenders block off main Attacker Side Mid entrance with Molotov
Attacker moves to opposite side of Mid without the Defenders knowing by using the indoor path
Defenders are unaware of Attacker

Scenario 1
First Attacker co-ordinates with second Attacker in Window Peak spot
They double peak and take out both Defenders at once

Scenario 2
Attacker sits in default Mid position
Defenders throw a flash grenade to force Attacker into cover
While doing this a Defender quickly moves to Danger Box while anticipating a Window Peak

Scenario 2
First Attacker co-ordinates with second Attacker in Window Peak spot
They double peak but are taken out due to skilled shooting and an unsuspecting off angle from a Defender
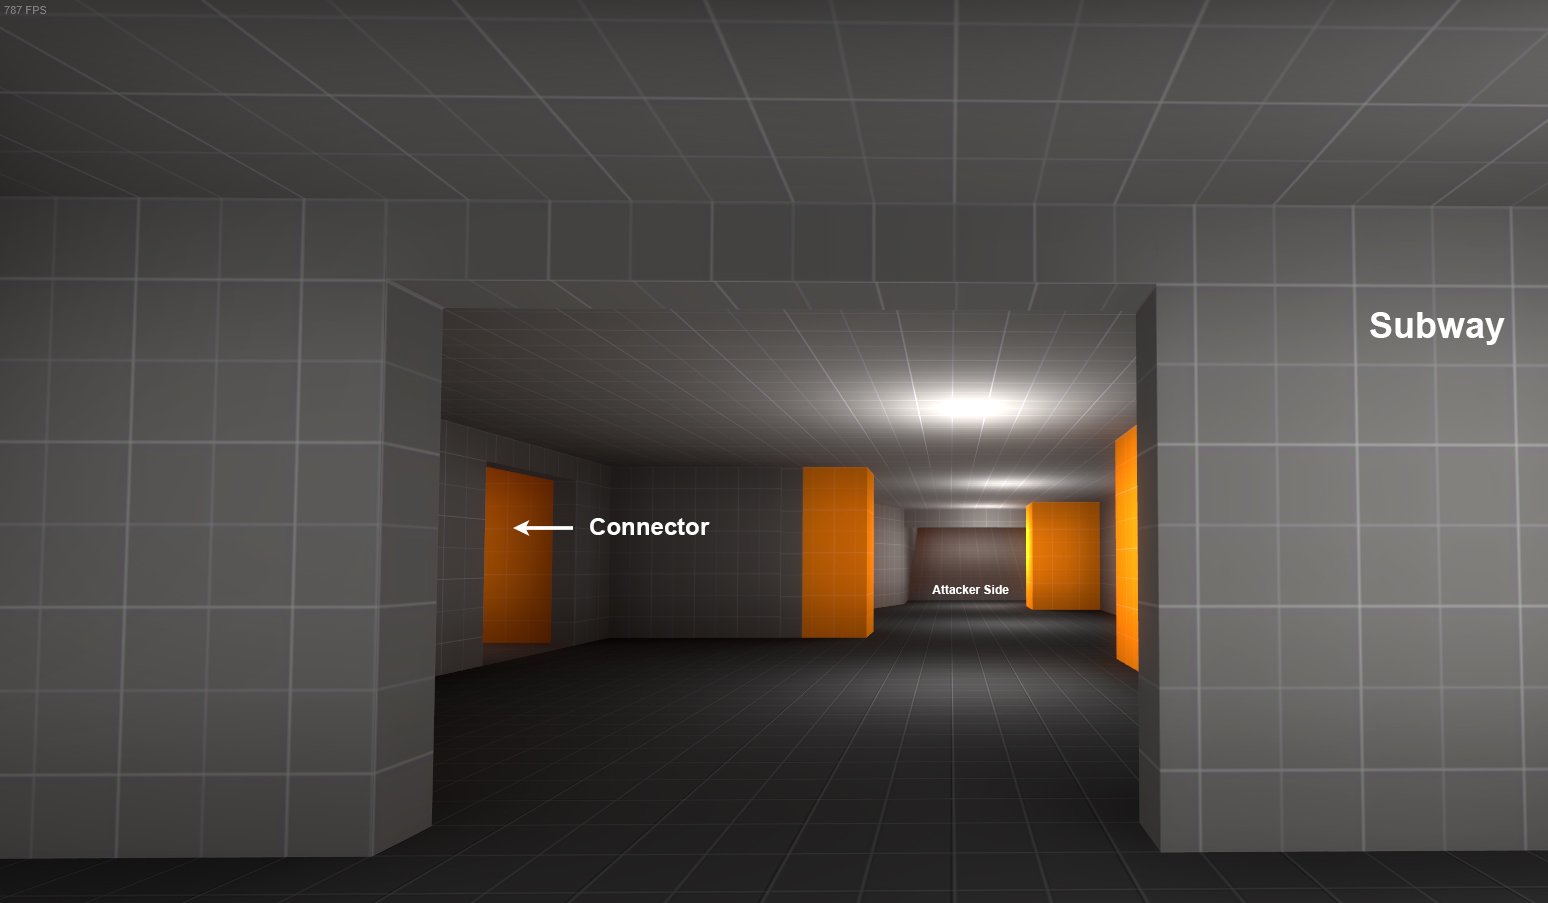
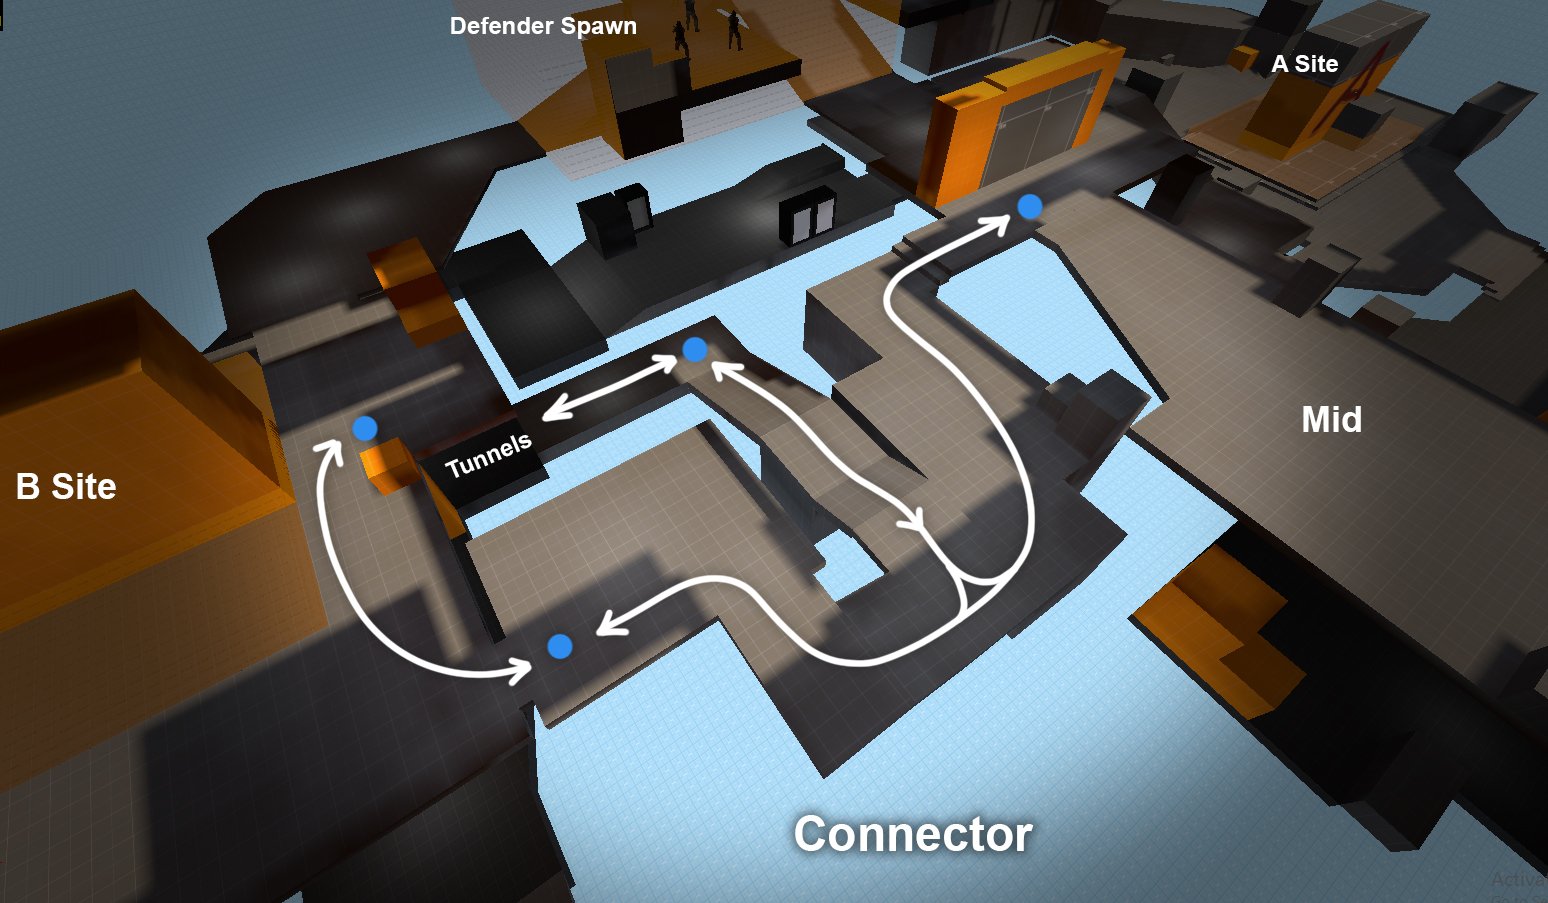
Connector


Connector is a valuable area to gain control over
Holding Connector as a single player is hard
Due to its multiple entrances, players will need to be wary of flanks
Being able to move between B site and Mid is valuable but also leaves each site a player down when you leave and players may find they are blocked off when they go to return to help
When attacking B Site, Attackers will need to anticipate Defender actions when blocking off Connector as Defenders can easily reroute and attack from a different entrance
Example Plays

Scenario 1
Defender in Mid communicates to team that Attackers have taken control over Mid and are pushing into Window Room
A Defender rotates through connector to flank the pushing Attacker

Scenario 2
Attackers do a sneaky push through Tunnels and move into connector
Attackers can now attack the site from an unexpected entrance
One Attacker will need to watch Defenders coming from Mid once the Defenders are aware of their presence
B Bombsite
One main entrance
Access to connector if Attackers gain control of Tunnel
Access to Subway Ramp and a 3rd entrance to B if Attackers push Tunnel even further
Open roof allows for grenades to be thrown into and out of the site from safety
Attackers will need to be wary of flanks due to Tunnel and Connector
Gaining Mid control is very valuable when attacking B Site
Multiple entrance options for Retakes but they can be blocked easily, requiring Defenders retaking to play smart or change routes quickly after being blocked

Positioning
Defenders will fall back to default positions as the site gets successfully taken over. Eventually, they will be pushed off the site and have to reroute to attack from a different entrance or try to catch the Attackers off guard by taking a longer path to enter from a flanking entrance. This can pay off but is risky due to the short-timer once the bomb is planted.
Defenders can hold off angles and hide in unexpected places to catch Attackers out but those Defending positions are risky due to either a lack of cover or the position being too boxed in.
Attackers can plant the bomb in a safe spot where they are well covered while planting but this will also help the Defenders when they are diffusing the bomb.
B site is a lot easier to hide on for a Defender if the site gets smoked off and the bomb goes down
Attackers will need to make sure they fully clear the bomb site before planting or are at least very aware whether or not a Defender might still be on the site
The tunnel and connector allow players to be very strategic and tricky when attacking or retaking B Site

Example Plays

Scenario 1
Defenders take default positions
Attackers group up and prepare grenades for attack

Scenario 1
Attackers block an angle with smoke, forcing the Defender to move
Attackers through a well timed Flash grenade and push onto the site, killing the 2 Defenders holding angles
The bomb is planted while the rest of the Attacking team hold the necessary angles

Scenario 2
Defenders take default positions
One Defender goes to Tunnel to gather information and decides to push tunnels and flank the Attackers
Attackers group up and prepare grenades for attack

Scenario 2
Attackers block an angle with smoke, forcing the Defender to move
Two Attackers are killed when pushing onto the site
Lurking Defender flanks and kills two Attackers
Tunnel


Tunnel acts as a second Mid
It is valuable due to its access to Connector
If Attackers push further they can gain access to Subway Ramp and get onto B Site
Attacker side of Tunnel has a ramp that shows the Attacker’s feet first as they walk down it. This disadvantage stops Attackers rushing Tunnels easily
Defenders can push Tunnels to flank Attackers
Going through Connector to Subway Ramp is a common path when Defenders are retaking